Learn how to mind map with Tony Buzan in this article. Mr. Buzan wrote dozens of books on the topic and travels around the world to educate people about mind mapping. And the beauty of it is, that it won’t cost you anything but the time and effort to read this article to learn how to mind map the way the master does this.
How To Mind Map With Tony Buzan
(or how 3 simple rules can change your information management forever)
When you like to learn “How To Mind Map Tony Buzan Style”, you can of course read his books. I would like to give you the essence of what he talks about so you are able to create a good traditional mind map. Here are the 3 rules that you have to follow to create a good Buzan type (or classical) mindmap.
Study Routine: Smart Summarizing
Rule 1: Start From The Middle
In mind mapping, we create notes in such a way that our brain is loving it. The brain doesn’t operate in a linear fashion. It jumps from concept to concept, from idea to idea, and from association to association.
It makes sense that way to create an overview of your information on paper (from presentations, notes, meetings, books, thoughts, etc.) that allows you to add new thoughts and data easily without too much hassle.
That is why we start working from the center of our sheet.
This way you can add your information on all sides of the topic.
Add your topic to the center, draw it and name it. So you create a picture that represents your topic and you CAN add the word of the picture below/in it. You don’t need to write the word as well when you are creating a map for yourself (probably).
Mr. Buzan advises that the center of the map should be big, inviting, and consist of at least 3 to 5 colors. It must be something you want to have a look at. That way it is easier to look back at your notes and your brain will remember it much easier.
Here are some examples of center topics.
Rule 2: Add Thoughts To The Center
Now we come to the fun part. We are adding our information to the map. This is done by simply drawing a little line (a branch) from the center, pulling it outward, and writing our image or work on the line. Make sure the line is under the entire word/image.
Let’s create a mind map with the topic HOME. We put that in the center:

If I ask you to think about your home… what happens? You probably start to think about other words or you see images pop up in your brain. Things like dinner, sleeping, parents, partner, cleaning, etc.
When I create a mind map on the topic home, my next ‘level’ directly next to the center “HOME” will be these words:

The moment I think of HOME and DINNER, I may think of buying food, preparing it, inviting people, etc. So all of these are added to the mind map as well. Note that in the classical method, there is no mention of the order of the information added in the sub-branches. For clarity, I will create an order that is logical to me:

This is how you add information. Note that I only use one word per node on every branch. This is typical for Buzan-style mind mapping.
I used words only in this example, but that is not really the way it is supposed to be. Let’s have a look at the third rule for creating mind maps.
Study Routine: Smart Summarizing
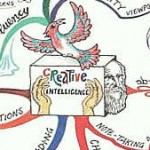
Rule 3: Use Images, Colors & Text
This is the part where the real difference is made when looking at different mind mapping styles. I would like to discuss with you “how to mind map Buzan style”. This is an important part of your next mind mapping experience. Mr. Buzan puts a lot of emphasis on using lots of images, and colors and as a final tool uses text to create the mind map.
You should use as many images as possible to stimulate your entire brain. Normally you would use words. These stimulate (in the classical teachings) the left side of the brain. The right hemisphere is stimulated by colors and images. So you should add these to your mind map to make sure you use your entire brain as much as possible.
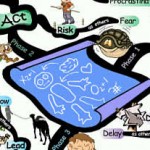
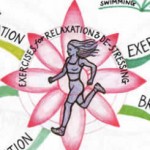
Have a look at this example I found online:

And now look at this:

Which one is more inviting to your brain to look at? I would think the last one is, right? That is what images and colors will do for your brain.
You can imagine that showing the image to different people will evoke different responses. Some people really love the bright and colorful mind map. Others are much more drawn toward the basic black and white text map.
No problem with that… except that the basic map is not (by the way Mr. Buzan defines mind mapping) a good/correct or perhaps even real mind map.
An advantage of the bright colorful mind map is that it stimulates your brain a lot more. For some, however, this is overstimulating and they turn away from using this method of working.
A disadvantage of the second map is that it takes a lot of time and effort to make (compared to the first map). Even if you are a real artist and know what you want to draw, it still takes more time. No problem you have that time, a challenge if you haven’t :).
In my own practical mind mapping method, I revert the order 180 degrees. I go from Text to adding Colors and then using Images (but we can talk about that later).
You add images only when you have time and want to clarify things (perhaps). If you don’t the map still works and you saved yourself a lot of time.
Learn How To Mind Map By Tony Buzan, and receive a Free mind mapping PDF
When you would like to read this information at a later time, you should save this page, or you can sign up for the newsletter so you can learn more later
Let’s move forward and mind map our information! Thank you for your time and effort to learn how to mind map with Tony Buzan.