So you heard about mind mapping and thought it would be smart to learn more about it.
Great!
I will share with you everything you need to know to start using mind maps for studying.
“A picture is worth a thousand words”

People are very visual creatures. We can process information better when we see it. That is why you should be using a more visual format for your notes. You will understand and memorize the information better and faster.
People have been visualizing their information for thousands of years. A little over 40 years ago, Tony Buzan described a system to outline your notes in a brain-friendly way. This is what is called mind mapping (or traditional mind mapping as I refer to it when talking about Buzan-type mind maps).
In the next few minutes, you will learn how to create mind maps using 5 rules of mind mapping. I will teach you how to create mind maps in line with the original system of Tony Buzan.
Rule 1: Draw a mind map, don’t write
Mind maps are brain-friendly. They help you to create a picture of your information. Take your sheet, and turn it so the long side is facing you (landscape mode). This way you can add all your notes and ideas to the map easier. We go wide-screen for your notes!
Here is what this looks like for your mind map:
Rule 2: Work Radial, Start In The Middle
The topic of a mind map is added to the center of the sheet. This way you can add all your relevant information around this central topic.
The traditional way of mind mapping teaches us that you create a nice-looking picture of your central topic. In fact, it states you should be using many, many images in your mind map
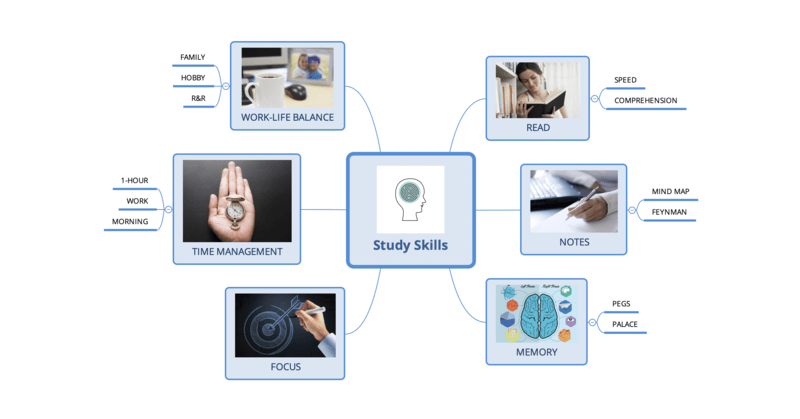
The topic of the example map I will create with you is Study Skills. The image I found for this is … Let’s put this in our map:

This is a central image with the keyword or topic of the map just below it.
Question: What is the topic of your mind map?
You can use for instance the title of the chapter you are studying, perhaps even the title of the book (if it is not that thick). You can also use the topic of your essay.
Now let’s add some branches to this map with relevant topics, or in this case study skills.
Rule 3: Add Your Information
Now that you have a topic for your map, it is time to add information to your map. This can be the notes from your book, an outline for an essay, or a brainstorming session.
Traditionally, we try and find images for each idea we want to add to the mind map. If you can’t, you can use a keyword. If you like, you can add an image and the keyword.
A traditional mind map is usually filled with images. They are very colorful overviews of information. Some people really like working on their maps and creating a nice-looking overview.
Don’t worry if you don’t, or if you don’t have the time to do this. If you don’t have too much time, focus on finding and adding keywords first. Make sure that when you add keywords, you only add a single keyword to a node in your map. Don’t write sentences in your map.
The main point is… get started! Add your information to your map. If this is words or images doesn’t matter (although the traditional Buzan method favors you to use images most of the time).
Here’s how you add your information to the map.
When you look at a tree, you see many branches, smaller branches, and leaves.
A mind map is built similarly. The trunk of the tree is the topic (which is in the center of the map).
Around that, you have different topics. You can view these as the branches of a tree. Following these branches, you end up with smaller branches (sub-topics) and eventually the leaves (the details).
When you use keywords, you focus on using just one keyword per node.
Question: What topics will you add to your map?
Think about section headings, paragraph headings, and keywords (bold, in the sideline, other words that draw your attention). Add these to your mind map
Here is what the map I create could look like.
Notice that I write COULD look like. When you create a map on the same topic, you may and probably will outline the information differently. In fact, you may have found different words that you like to use.
SIDE NOTE: I don’t really like to add images to every location in a map. It makes the map too big and not really clear. I rather work with keywords only. If I really have to, I add an image, graphic, or outline.
Talking about creating a different map… Here you can see rule 4…
Rule 4: A mind map is a personal outline of the information
You find the words for the map, you outline the information according to your understanding and needs. There is not really a good or bad way of mind mapping.
What you will see is that your style of mind mapping (hopefully) will change the more you use it.
You will become better at finding the right words, create a repository of images you use, and start using templates.
This is all based on how you feel you can outline your information better. That is why mind mapping is a very personal way of managing your data.
The main branch for one person may actually be a small detail in a sub-sub-branch in another person’s map.
Develop your own personal style. Get influenced by other people, but always learn to create your own system of mind mapping.
In the beginning, you probably follow the tips and tricks of other people (like me). Later on, you find your own system. Once you do, let me know and show me how you manage your study and work-related information. I’d love to hear from you!
Rule 5: Simple wins the day (and your exam)!
Don’t try to create really good-looking maps. Traditional mind mapping may sound like a way to be really creative… but… well, you are right about that. It is about creating something nice looking.
When you develop your own style, based on your experiences, don’t fall into that trap. You don’t need to have a nice-looking mind map. Only when you benefit from creating a beautiful map, you will create one.
If you only need to have a clear outline of your information, and that helps you move forward, do just that!
Here’s one small but important tip. You should highlight related information in your map using the same color. That gives you a really quick overview of the information that you should group or study together.
Not having these colors (for related topics), and not connecting them, you may feel lost. Don’t feel that way. Keep things simple! Identify related concepts and give them the same color.
When you feel all of this is too much work… have a look at the practical mind mapping approach I wrote about.
Action Points on Mind Mapping As An Adult Learner.
Remember this very important rule: A mind map is just a tool, not the end goal. When you get started with mind mapping, you may feel you have to create something nice-looking. The traditional mind mappers will advise you to create image-rich, good-looking maps.
How important this may be, I believe creating a mind map to get a better overview and improve your topic understanding is much more important.
Focus on getting your information outlined in a mind map. This way you will be able to benefit from the map and become a much more productive adult learner.
If you have any questions, let me know. We can do this together!
By the way… we use mind maps a lot in the Studying Made Easy course and coaching. If you like to learn more, I invite you to read more on the website or check out my course.