In this article, we’ll have a look at how you can not just use microlearning.
You will even learn a system that enables you to create your own microlearning lessons.
All of this will be based on your own studies and your own needs.
Personal Benefits of Implementing Microlearning
Most websites talking about implementing microlearning are focused on large companies implementing the principles into their own courses.
This article doesn’t do that. I want to share with you how you can implement microlearning in your own studies. This offers two very important advantages to you.
The first benefit is that you will be thinking about your studies and the results you want to achieve differently. You don’t just take in information. You think about what is important and how you can learn the concepts and other information.

Another benefit is that you create a personal training program. This won’t take up a lot of time. You are already taking notes and memorizing information. Now you become your own personal teacher for the book you are studying.
Looking at the 4 stages of learning or competence (Martin M. Broadwell, 1969), you jump from being unconscious incompetent and to unconsciously competent. You go from a beginner in a topic, to a teacher!
This is very powerful because it helps you to focus on the needs of the student (you in this case), and how you deliver the information as clearly as possible.
I even dare to say that the moment you created a micro lesson, you may not even need to spend a lot of time using the lesson. You could already have learned the lesson and memorized the information!
Having said all that, let’s get practical and explore how you can start using microlearning in your own studies.
Learn to use microlearning in your own studies
Microlearning is practical, goal-oriented, and fast-paced. Here is how you can use it in your own studies.
There are two important areas we have to focus on. The first one is the creation of the content of the microlesson. The second area is the way you will deliver the lesson.
Delivery of lessons:
Let’s start with the delivery of the lesson first. The reason we do this is that it influences how you will create your lessons.
Will you use text lessons, or perhaps audio, or video? Or maybe you will use all 3 formats for some lessons at the same time.
Thank about where you like to do your microlesson. Is this while waiting in line? Or in your car? When you are waiting in line, you may want to have a text-based lesson. This could be a list of questions, words, or ideas you read and overview. A lesson to take in your car is probably delivered in audio form.
When you know where you are most likely taking your lesson, you know the format to create it in.
But what do you put into your lesson? Here’s the answer to that…

Content of a microlesson
In a video of Fuseschool, they told they took a chemistry curriculum and broke that down into 240 individual micro lessons. For each block, they created a microlesson.
Finding the key lessons could be difficult at first. One easy-to-use method is using a mind map.
When you create your notes in mind map format, you identified all the key concepts, keywords, and connections in your books (or chapter). The moment you have these neatly organized in a mind map, you’ve found the microlessons.
The only thing you have to do next is create microlessons based on all the nodes in your mind map.
You can start at the beginning of a branch in your mind map and follow this downward.
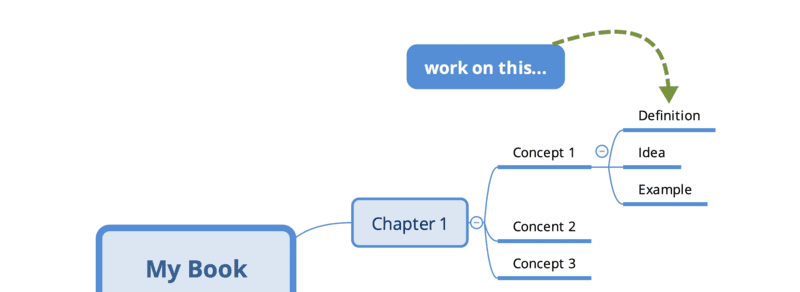
You think about how to create a lesson for that particular node. Will you:
- Give a definition of the node content
- Explain it using an example
- List pros and cons
- How to use this in your work or life
- Ask a series of questions (using the active recall method)
- Give background information
- Or use a combination of all of these
A lesson doesn’t have to take that long to create. You can even take a few nodes from your map and combine them into one microlesson.
Remember that the format you use to deliver the lesson depends on the way you will take this lesson. If you want to go all fancy, do this for each microlesson:
- Create a short video explaining the node (add examples, practical usage, etc.)
- Take the video and put it on your phone, YouTube account, Google Drive, or any other place where you can easily reach it on the go
- Of course, you can also listen to the video (so you have an audio version at the same time)
- Take a few notes from the video and create a short text file or even email message (make sure you make the lesson name the subject of the video)
- Create a list of 5 to 10 questions for your active recall session
Creating a video doesn’t have to be difficult. Just use a screen recorder to guide yourself through your mind map. Or read aloud your notes. You don’t have to be in the video. As long as you record and you can hear yourself talking 🙂
Focus on one topic or a sub-branch for each video. If one node is only a very short lesson, you can expand. As long as you don’t create long videos (over 3-5 minutes), you are good to go, literally :)! Please make sure the lessons are practical to make it easy to see their value and understand the content faster.
The next step is easy. You start using the microlessons you created.
This means whenever you have time, or perhaps when you scheduled time to go over a lesson… you take that lesson!
Think about doing them while waiting, going to work (audio lesson), during a (lunch) break, or simply whenever you feel like it. These lessons are short and to the point.
What you will see is that often the mere act of creating the lessons helps you to memorize and understand them already. This means you are never wasting time and always growing!
Important to know
There you have it. Now you know how you can implement microlearning in your own studies.
The main ideas you should keep in mind are:
- Be very, very practical. Focus on delivering one idea, concept, or theory
- Base your lessons on a real-life example. This way you can relate better to the information and understand the ideas much quicker
- Simply creating the lessons will help you to understand the concept faster. You may not even need the lesson after you created it yourself!
Remember that microlearning isn’t only about learning a new skill. It can perfectly help you with learning new ideas, concepts, and theories. Increase your knowledge and understanding through microlearning.
If you have questions about this, let me know. I’d love to help you become a smart adult learner.