Digital mind mapping is hot. More and more people are using it to create overviews, increase understanding, take notes during meetings, and outline projects using a simple mind map. Well… I write simple, but when you see the mind maps people create, you know they have a basic understanding of mind mapping, but they could use some assistance. That is where I step into the picture.
our life is frittered away by detail… simplify, simplify – Henry David Thoreau
What I do is assist business and academic professionals and students to simplify their information. The beauty is that when you have a huge amount of information, it often only takes a small change in perspective to create knowledge and understand it. That is what I do. I simplify information and by doing that I’m able to reduce stress and increase insight and understanding.
My role is to train business professionals who are studying to do that. I help them organize their books and other information and help them create knowledge maps (or visual maps or mind maps).
One of the tools I use for that is mind mapping on a computer. The system I use is really simple. I call it the C.O.W!. system. C.O.W!. stands for Capture, Organize, and Work. You will use this system to master digital mind mapping.
The digital mapping techniques you will learn are (almost) software independent. It will help you to create maps on any device.
CHOOSING YOUR SOFTWARE TOOL
When you are not sure which tool you should or can use best, I can advise you this: make sure you find a tool that is easy to use. All the features and options the biggest tools have are just about the same. They can work together with Microsoft Word, PowerPoint, Excel, Outlook, etc. They can all create PDF files (and even if they don’t you can just install a PDF printer (windows | mac) and you are good to go).
The single biggest thing you should pay attention to is the way you use the tool and if it is easy enough for you. You want the information to go from your head, book, and conversation straight into the mind map. You don’t want to worry about the way you need to add information to your computer. A small example: do you think about the way you create a new line when writing emails?
No, you simply press return and it is done. You don’t think about it. The same should be the case with your mind mapping tool. I created a list of the most important mind-mapping software tools. I called this resource the Ultimate Guide to Mind Mapping Software. Have a look at it. Download some tools if you like. I believe almost all of them have a trial period in which you can test-drive them. If you are still unsure, let me know so I can assist you personally.
USAGES OF DIGITAL MIND MAPPING
You can take notes using mind maps, prepare, create, and deliver presentations, do personal or group brainstorming sessions, and outline your projects, plans, or life. You can pretty much do all the things you could do on paper as well.
Still, there is of course a difference. A mind map on your computer is usually less personal (using typed fonts) but is easier to update and edit. The biggest beauty though is, of course, that you can connect much easier to any other digital resource. This could be another mind map, or Word documents, PDF files, folders on your computer, internet addresses, mail addresses, images, video, etc.
The map is no longer a simple overview. It turned into a visual resource that helps you create insight, overview, and clarity. The map IS your personal version of a knowledge resource that is available to you 24/7.
I often call my mind maps my personal assistants. They offer me insight in my planning and my business. They show me how all the information in my head is actually connected and ready to be used. This can of course also be the case for you. Perhaps it is good if we focus on something like that in this tutorial. I will create a mind map on a certain topic and make it as complete as possible for the moment.
You do the same with your topic and we both compare maps at the end. It is time to get started with mind mapping on your computer. Do you have your software ready? Are you ready to create a digital mind map together? Do you have a topic? Let’s go then!
DIGITAL MIND MAPPING IN 3 SIMPLE STEPS
What I did is I created a small system that you can use to mind map your ideas, thoughts, and information. They are simple steps to follow. What I learned a long time ago is that when you start using systems, you can be sure that you are making progress much faster and you don’t have to think about what’s next. You simply do what you read and you move forward.
Small suggestion… do this for your own work, hobbies, and more as well. Create a system that you can follow. Is it working? Great, continue to use it. Do you feel that you are missing things or making it too complicated? Change the system. Adapt and grow! Your life will be much easier and your work will be done in a lot less time than before.
the ability to simplify means to eliminate the unnecessary so that the necessary may speak – Hans Hofmann
Here are the digital mind mapping steps and what you should and shouldn’t do when mind mapping on your electronic device. They are (of course) the same as the steps we use when mind mapping on paper. They are the same, yet the way we implement them is different.
To make it easier for you, and to see a practical example as well, I will create a mind map together with you. You just follow me and do what I do with the topic you choose for your digital mind map. Let’s do this!
STEP 1: Capture information
Big difference here right from the start. Where we would create a list of keywords or topics on a separate piece of paper when mind mapping on paper, we just add all keywords to the mind map straight away. The reason for this is that we can re-organize them later on. Another thing is that you don’t organize them when you start your map.
This is because you only want to focus on getting information from your head onto the screen. When you want to organize the words and create a structure at the same time, you are most likely missing out on one of them, probably you miss words…
Note that I do not recommend this all the time. When you are summarizing a book in, for example, one hour, you add the structure to the map immediately. This is because your book offers you the structure already and you only need to transfer this to your mind map. But during a brainstorm session, you can do it as I told you, add words and then organize them afterward.
My topic for this practical mind map is “outline my new 13-week coaching program in practical brain management and stress-free productivity“.
Here is the result of my short 2-minute brainstorm session.
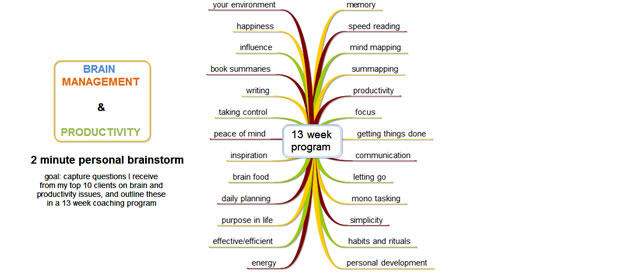
What I did was I stepped into the shoes of my top 10 clients and ask myself… what I need and what results I am looking for when I enroll in this program. Then I started the clock. I usually do things with a timer. Sounds strange perhaps, but it seems my brain loves the pressure 🙂 I need a deadline. I figured I need two minutes… so what you see above is what I created.
The tool I use for this is MindMapper Professional, as said before, you can do this with nearly every tool you like.
For me, this concludes this first step. I suggest you take your time to complete this step now as well. When you are done, continue reading. Don’t read and do nothing else. You need to take action, implement what you learn, and grow. This way you can make sure the time we spend together on this short training is used wisely.
ADDITIONAL NOTES FOR STEP 1.
You should know that the C.O.W!. system is not something that should be used to go straight from capturing to working with the map in a straight line. Often you go from capture to organize, to capture again. You only go to work when the map is good enough for you to work with it. And even then, you might go back to capture and organize from now and then.
Autopaste
The MindMapper tool has a really good feature that will help you when reading web pages, word documents, PDF files, etc. Turn auto paste on and when you select text in your document, MindMapper will capture what you selected. This is really cool when you are going through documents for your work or study and you need to quickly take notes.
Do a personal or group brainstorm
Do it just like I did. Put yourself in the shoes or situation of another person. This works especially well when you are working on a presentation, preparing for a (sales) meeting, or when you are writing a book. Brainstorm as if you are the other person. You might even ask questions to that person.
You can do this alone, but also by asking a friend or co-worker to play the role of the other person. Group brainstorming is a wonderful thing you can use in these situations. The only thing you have to do is listen closely and take notes as quickly as possible.
Text Summarizer
Do you have a long text and do you need a summary of it? A business friend created a tool for this. He called it the Websummarizer. It is really cool. You take your text and you feed it into the summarizer. The result is a good summary that can be presented in text, but also using a mind map. This tool will save you lots of time. Have a look here
Be As Complete As Possible
You might think that adding keywords is the best thing to do. That could be correct in most cases. But when you are dealing with a digital mind map of your work, when planning or when studying, you need to be thorough. What you can do in this case is to also mention email addresses, drag docs into the mind map and create links to folders.
My suggestion is that you don’t focus straight from the start on links to other documents. First focus on the keywords! Then, when you added most of the keywords, you can spend time adding other resources. That will help you achieve more in less time.
Your Next Mind Map Is Nearly Ready
This is a sweet tip that will save you time and help you create maps that are filled with the right information. This wonderful idea is called: TEMPLATES
A mind mapping template will help you to always remember what you need to add. At the same time, the template can be a means to reduce your stress and make your work clearer. After all, you now know that a map created using a template shows you exactly what you need to know.
Fill In The Blanks
Some people find it difficult to know how many words they need to add to their map in the first round of the C.O.W!. system. My suggestion is that you create a blank map with 15 to 20 new and empty branches. Now you only have to fill in the blanks. The beauty of working like this is that your brain doesn’t like empty boxes or branches. It will do its best to put something on every branch. This is what you need!
(I know that some of the people who read this will get really stressed when they have to work like this. If so… just don’t do it 🙂 )
(Real Time) Collaboration
When you do personal brainstorming, you can be assured that you will find lots of new and interesting keywords. But when that doesn’t happen, you can start a real-time collaboration session. What this basically means is that you can invite X number of people to work on your map, in real-time or when other people have time.
I’ve done this a number of times now and it is always really cool to see that a mind map is growing right there on your screen. People respond to each other’s contributions. The map is a playground for creativity and ideas.
STEP 2: Organize information
While the first step is important to find the information you think you need, this step is probably even more important. Outlining your information creates the real insight, understanding, overview, and knowledge you are looking for. This is the most important part of CREATING a mind map. This is where you can see which people understand visually outlining information and which people don’t.
You see, most trainers in mind mapping don’t spend time on this topic. They tell you to add information to the map and make it pretty. This is wrong. You should be spending most of your time in step 2 I believe.
Think about it, you have a choice of adding many, many words to a map almost at random… Or you can have just a few words but you create a good structure to it… Which one will help you the most? Of course, it will be the second choice. Well-placed words in a good structure are worth a lot more than just a bunch of words without good placement.
I have to admit, when you see many words, your mind will probably start to see patterns by itself already. It will create invisible connections between (key) concepts. The moment you would outline these words in a new map or you drag and drop them to the right location in your digital mind map, the map will be much more powerful in helping you understand what you are looking at.
I often use the following example. When you have two people who are meant to be together but they are not aware of each other, and they are miles apart, will their love grow and can they complement each other? Most definitely not!
But what happens when you bring the two of them together, you make sure they interact… something beautiful will happen.
The same is true about words in a mind map. Some words need, deserve, or want to be close to each other. These are the words that need to be grouped. On the other hand, there are complete branches that also need each other to flourish. Make sure these branches are near each other. Give them a way they can inspire and clarify the information to you.
IMPORTANT:
It might go a little too deep for us right now to discuss this, but I do want to share it with you. Take two branches that need to be near each other. Do you know where the opportunity is located? Do you know where growth, insight, and wisdom is in this picture?
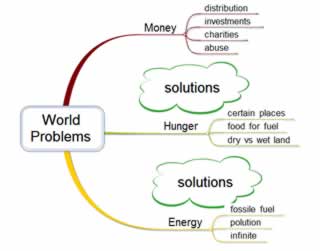
The answer to the above questions is not that difficult, as long as you can learn to move beyond the map itself.
You started with a blank sheet or screen. Information was added to your screen. Now you have a mind map that is giving you an overview of the information. You created knowledge from the information. Other people might have created another overview. You created this one. This is what you see in the combination of all this information. You solved the puzzle.
Wisdom, opportunity, creativity, ideas, growth, and insight are not located ON the map branches. They are ready to be used BETWEEN the branches. That’s right, in the white background space between the branches. Use that and make your maps and understanding even bigger.
The moment I noticed what was in between was also the same moment when, within a couple of days, two books came from my head and hands that helped people from all over the world reduce even more stress and make their lives more meaningful and clear. (But that’s a different story which I would love to tell you all about it later).
MAKING THIS PRACTICAL
Here’s what you do in this step of the C.O.W!. system.
You make sure that in your map all the information is dragged and dropped in the locations where it will have the highest impact. This may take some time. Take that time. You are creating knowledge, remember!
If for any moment in time, you feel that you are missing words or other information, you add them. What you basically do is perform a personal brainstorm session based on the content of the map, while you are arranging the words in a good structure. This might be perceived as doing step 2 and step 1 at the same time.
Adding another word is simply going back to step 1 for a few seconds. Then step 2 starts again and you continue. Be flexible and see where you can improve your map. The outcome is only getting better because of this!
The moment you feel like the map is ready you go to step 3.
When do you know the map is ready? Most often, you know because you create each map with a purpose in mind. Does the map help you meet your purpose? Then you are ready.
For me, the map I created (and shown below) is ready I think. It helps me reach my goal, of outlining my 13-week coaching program.
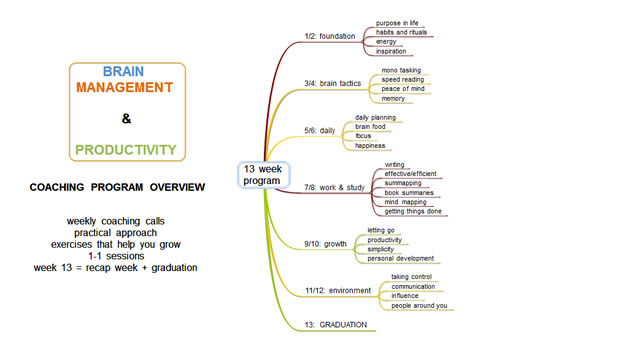
The reason I know it is ready is simple. I have all the outline and structure I need to make the coaching program for people something they will benefit from (and more).
How about you? Did you finish step 2 for your digital mind map also? If not, let me know what I can do to assist you. If so, do send me the map so we can look at it together. Just make sure you tell me the reason why you are creating a mind map as well.
ADDITIONAL NOTES FOR STEP 2
Above, you find the information that will guide you through step 2. There is more information that could be handy so I want to share that with you below. Read it, use it when possible, and your digital mind map will be even more powerful and clean. You will benefit from the information you have in your map. Let’s go!
Make Use Of Hyperlinks
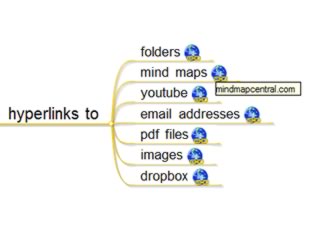
The advantage of a digital mind map is that you can literally connect it to other sources of information. Most people don’t do that and that is a shame. Your digital mind map gets so much more valuable when you link it to other information. You could think about creating a (hyper) link to:
- other mind maps

- MS Office or other desktop publishing documents
- PDF files
- Images
- Video files
- Youtube videos
- Twitter, Facebook, and Linkedin information
- Email addresses
- Folders on your computer
- Dropbox or Google Drive files
- Phone numbers
- Company websites
- Online resources
- Any other type of file, idea, thought, map or thing that is available digitally and linkable.
Most mind-mapping tools can link to other sources. Make sure you use this in your map when needed. It is good to build up a library of maps for example that you can link to and have at your disposal when needed.
Change the FONT Size
The font size is something I hardly see people change when they are mind mapping. The mind mapping theory states that font sizes should decrease when moving into lower levels of the map. Great… but not always practical.
When you are making a practical mind map, you want to create a clear overview in as little time as needed. The best way to not do this is by wasting a lot of time on finding the perfect image. One thing you can do literally in seconds is select important pieces of text and increase their size. This makes them more prominent and people will look at them much faster (a great way to capture the attention of your audience and steer their thoughts…).
You can of course also decrease the font size. By doing that, you show yourself or other people who go through your map that information is probably less interesting or valuable.

This quick tip will save you so much time and improve your maps significantly. Having said that, I advise you to start using it today… really!
Colors Are Important, Use Them!
Do you have a color TV or computer screen? You probably do! Why don’t you have a black and white TV? Oh.. you like the colors? Well, start using that idea in your mind maps as well them.
The reason I am writing this after the font size idea is that colors draw attention. Here are a couple of ways you can use this in your own (digital) mind map:
- Select important pieces of the map and change their background color. For instance, when you are creating a plan, you can write the name of the people involved after each action point. What you can do as well is use colors that represent people in your team. You can use colors to identify TASKS, GOALS, IMPORTANCE, etc.

- Change the font color. I have to admit this one is not something I use often, but it does work. The few times I use it is when the background color is interfering with the black default color of the text. See the images above for an example
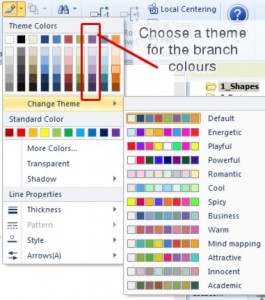
- Make sure the branches of your map have matching colors. Sure you can have them assigned randomly. Having matching branch colors will create a sense of unity and clarity. What I often do is select a couple of colors from a pallet that matches.

Using Images (If You Really Want This)
As I wrote before… using images in a practical mind map is often only a source of distraction for the maker of the map. Use them if you have them or you have a lot of time. Don’t try to find the perfect image, that probably doesn’t exist or it is only perfect for this moment (and no longer when you have more information added to the map).
When you want images, I have 3 places for you where you can find amazing images. Be careful not to just use them commercially… this might not be allowed :). My three sources of images are Flickr.com, Google.com/imghp, and StockUnlimited.
Flickr has an advanced search option that allows you to search for royalty-free images that you can use commercially.
Google images is free, but you don’t see if there is a license required to use the image. Still, you can find really good images that you can use in your personal projects.
The last one I often use is Deposit Photos. This one is really good. Many great images, are high quality, and you can use them for your business. The images are however not free. They are premium images. No problem if you don’t have to search a long time for the right image.
C.O.W!. Is Not A Linear Process
Don’t assume that you will be able to go from step 1 to step 2 to step 3 in one go. You probably need to go back from step 2 to step 1 a couple of times. The reason for that is simple. You probably forget words and ideas, and you will be inspired by the way you outline the current words to think of new words and concepts. Often the best words are the ones you write down immediately in the first time you do step 1, and the ones you think of in later moments you go through step 1 again.
 The first time you write your words in step 1 often determines the general outline of the map, the other words are associated and found because of these 3 to 6 first words.
This immediately shows you how powerful these first words are. They might determine your outcome to a large extent… Be sure you have a clearly defined purpose for the map. If you don’t you might see yourself ending up in a different place than you thought you were going…
A Single Map Is All You Need?
This one is tricky. One mistake many mindmappers make is that their maps are getting so big that they lose the overview. You see this a lot when people are just starting out. They add and add and add… and before they know it their map is HUGE! When they zoom out in such a way they can view their entire map… they can’t read the words on the map anymore.
Another thing people do is add so many images, that the map is getting too big as well. Below is an example of such a map where each branch has its image. You can probably imagine that this is not practical anymore. That is why I use colors more often than images.
As a personal rule of thumb, I only use images on the first level of the map (the one directly connected to the center. The reason for this is that it gives me a good overview really fast (because of the images), and I don’t have all the images in the lower levels of the map, making the map too big.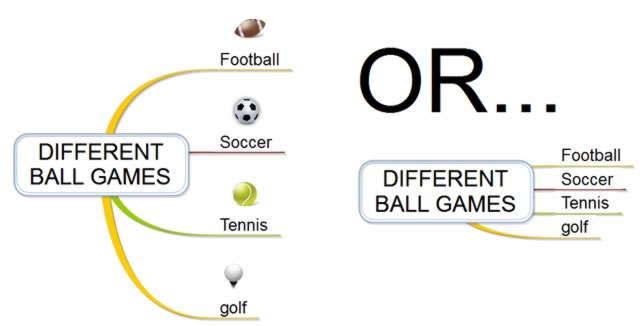
By the way, I only do this when I use the map for presentation, training, or communication purposes. Maps that I use with my team are in 99% of all cases 100% filled with words and no images. I do use colors as you can imagine.
If you feel your map is too big, you should break it up into multiple maps. Take some branches and create new mind maps for this single branch. My suggestion on what you do then is this. You take the branch and copy the content to a new map. You take the original map and there you keep the highest level of the branch, and you remove everything else in the branch.
The next vital thing is this. You now take your conclusions, main ideas, or a summary of the new mind map and you add that to the ‘old’ branch. This way you still have the highlights and no longer the burden of a large branch.
Have a look at the example below:
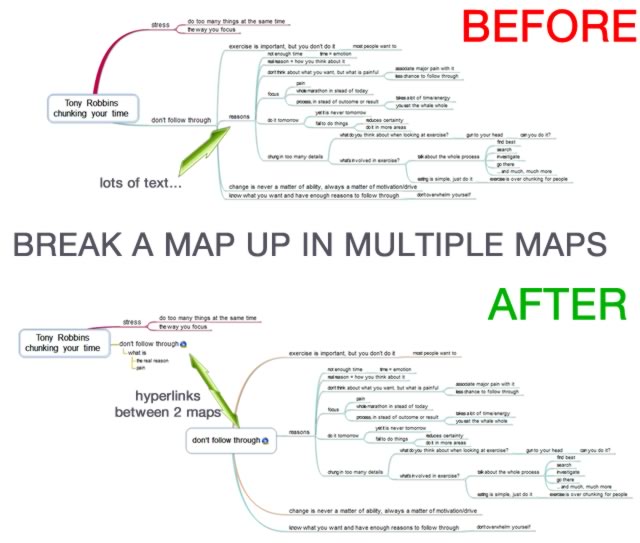
Of course, you make sure that the two branches use hyperlinks to refer to each other and you can easily switch between the two.
1 Screen Is Enough
Ever heard of Mr. Pareto? You probably didn’t… But you might have heard about the 80/20 rule. Pareto was an Italian economist. He said that 80% of all wealth was controlled by 20% of the population. I personally believe he was a very optimistic man… Any way… you can use this in mind mapping your information as well. Here’s how:
Create a map. Make it as large as you feel you like to. Then… you start to look at the content. You remove double information (which you most likely have) and you make sure all information is located where it should be located (remember this from the two people in love analogy?). When you did that, you can start to remove even more information that is not needed (sentences, stuff you know, etc.). What you end up with is an overview that is clear, much smaller (probably 80% smaller), and easier to remember and understand.
My point is this. When you zoom out your map to see all of it, and you can’t read the content… your map needs a little bit of Pareto. Do that, and you again end up with a compact, practical, and useful map.
Remove Sentences
This is kind of what we discussed before. Mr. Perato will probably love this one as well. Most mindmappers end up with whole sentences in their maps. The reason for this is simple. People are afraid they will lose information when they use keywords only. Don’t think that. And most of all don’t do that! It will clutter your map. Remove sentences. Only use keywords. Your map will become clearer and you will be able to understand and remember the content much faster.
A Secret… The Notes Section
Do you know that your mind mapping tool probably has something called a notes section? This allows you to store a whole lot of information in your map, but you won’t clutter your map! So you feel you still can’t say goodbye to all those sentences that we discussed earlier? No problem. Pick a few keywords and add those to the map. Then you take your original sentence, and you add that to the notes section of your branch/node.
You can even add more information to the notes section. In fact… write a complete novel or dissertation in it if you like to. The result is that your map is still as readable as it was, but you won’t see that information in it. There will just be a small icon that shows you there is a note attached to the node or the branch.
Most people don’t use this. Beginner mindmappers often don’t even know this is possible. You do so make sure you use it (and benefit from it)!
Use A Different Layout For The Same Map
When you look at a situation from a different angle, you end up looking at it differently. My tip for you is that when you are stuck and you don’t know how to outline your map the best way possible, you change the order of the branches and the content of the branches. Doing this will change your perspective. A different layout usually creates a different insight and level of understanding.
When you can’t do this ‘because all branches are mapped out exactly as they should be’ you can ask another person to rearrange the content. The best way of doing this is by asking a person who cannot understand what you are discussing. That way they won’t get sucked into your perspective. Go ahead, and ask a child to assist you in this. They just shuffle branches around and might even draw a couple of things on your map (as a bonus). I am sure you will look at your map differently when you get it back.
Conclusion Step 2:
Outlining your map is very, very important. This is where insight and understanding is created. This is where you can be creative. This is almost where creativity is created for you and you only have to see it happen right under your very own eyes. A good outline is not something you create in one sitting. It could be, but it is not likely. Make sure you go back to step 1 (adding words) whenever you feel this is needed or useful.
When you think there are words you no longer needed remove them. Remember to use the Pareto principle (80/20) in your mind mapping. Your maps get smaller and clearer. You will be able to identify the real issues and the things that need work (for example).
Don’t waste too much time on images. Use colors instead to create a picture-like overview that highlights important information or concepts. When your maps get too big, you:
- break them up into smaller maps (with hyperlinks between them),
- remove long sentences and replace them by keywords,
- trust your instinct to find good words and don’t use too many words anymore.
When you do this, your maps will get clean and clear. You will create peace of mind in your information. You create knowledge and wisdom from the information. Stress is reduced and success chances are increased. Good luck with this step!
STEP 3: Work with or Use the information!
You could take this as a bonus step. After all, you created your digital mind map already. Still, it is good to stop one moment and look at this step as well. You see, most people create lots of mind maps, but they don’t actually use them. Their maps are just one-time things that they create and look at… and never update again. I advise you to create as few mind maps as possible, but update them as often as they need this.
The result of this would be that you keep having a good overview in your information. Your maps will reflect what you know, where you are in your work, life or projects, and what you still need to do and know.
Update the map
The easiest way of doing this is to update a map with new information when this is available to you. Do you create a map for your studies? Then you update the map with new ideas or information from your books and classes. A map for your project is updated when situations change or people achieve (sub) goals. I am sure you understand what I mean by this.
Updating can be as simple as making the font of the information in the map smaller, giving it a light grey color, or using strikethrough letters for the text. Just as long as it is clear the information is no longer needed. You could even remove it completely. Often this is of course easier when you do this with information in the lowest levels of the map (because if you remove a higher level node, the nodes in lower levels are removed as well…
Share the map
Another thing you can do is share the map with other people. Give them access to the map (co-workers or team members who need the planning mind map), or share notes with fellow students. Or you could even upload it to the Biggerplate community!
Export the map
Another thing you can do is export the map to MS Word or PowerPoint. This way the map is transformed into a document that you can share with other people. Or you use it to give presentations (better do this with your mind map…). Wrote a book in your mind map structure? Export it and you have your book ready to be published (or just about…). Don’t you ever create a mind map just to create a mind map! Always use it to reach your goal.
And Now… What’s Next?
That is basically it. Now you know how to create a digital mind map fast. Be sure you share your experiences with this. I know it was a lot to go through. Still, I want to make sure this is not just a general digital mind mapping manual that you can find on just about every server around the Internet. We touched on a couple of very important issues (C.O.W!., location of words, notes, USING the map, etc.).
Make sure you understand and apply what you just read. Even if you ‘know all of this already’ I encourage you to make use of it. Don’t just know… APPLY!
Thanks for reading. I wish you all the best in mind mapping your ideas, projects, books, and anything else you can think of.
NOW IT IS TIME TO:
- subscribe to the newsletter and the quick start package using the form below
- send me your questions, tips, and ideas
- SHARE the information you just read with your friends, co-workers, and anybody else you like to share it with. A tweet, Facebook like, or other social media endorsement is much appreciated.
- use the information and benefit from it!
